Let’s Encrypt’s certificate in AWS Lightsail
Table of Contents
Renewing the certificate
This is an excerpt from the official tutorial “Step 3: Request a Let’s Encrypt SSL wildcard certificate“. Some commands were adjusted for the purpose of just renewing the certificate (instead of installing a new certbot instance).
1. Login to Lightsail: https://lightsail.aws.amazon.com
2. Enter the console
3. Set environmental variables:
export DOMAIN=mindyourdata.org && echo $DOMAIN
export WILDCARD=*.$DOMAIN && echo $WILDCARD
4. Request for the certificate:
sudo certbot -d $DOMAIN -d $WILDCARD --manual --preferred-challenges dns certonly5. Copy the DNS TXT record.
6. Don’t push the return key just yet (first make sure that the responses from the DNS will be OK, see the next steps).
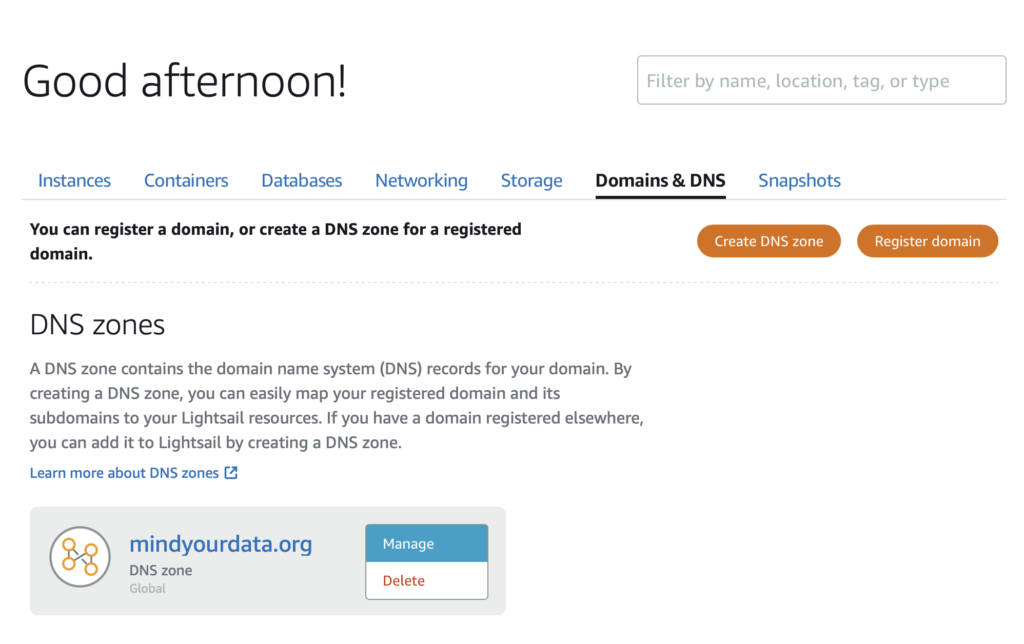
7. Go to LightSail home page => Domains & DNS and update TXT records. Update the records.

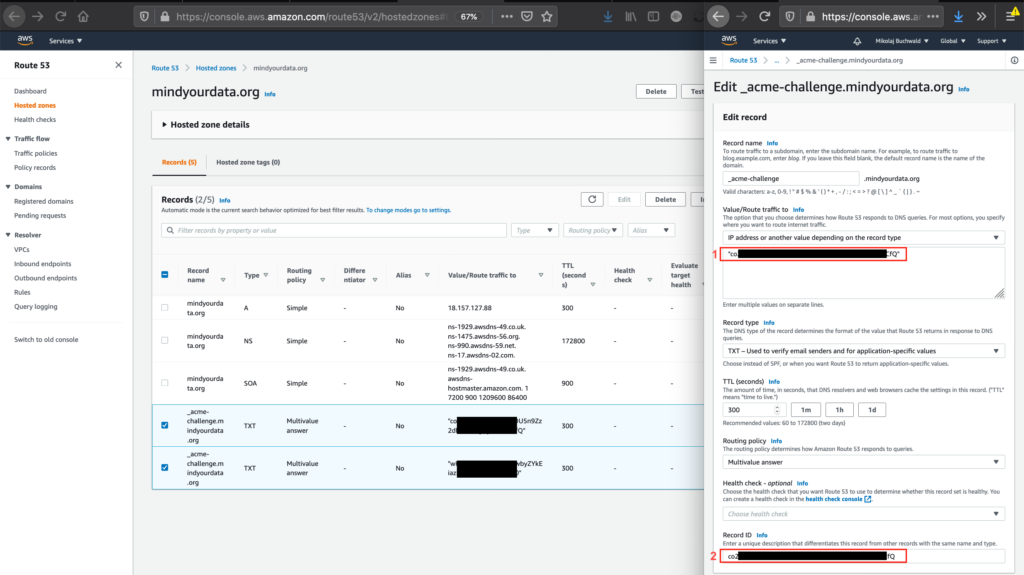
8. Go to Hosted Zones (Route 53)
9. Click your domain
10. Edit TXT records. Remember to update Record IDs as well.
11. You can check the response (including TXT records) with MX toolbox: https://mxtoolbox.com/SuperTool.aspx?action=txt%3a_acme-challenge.mindyourdata.org&run=toolpage
12. Complete certificate request in the instance’s console. You should see something like this:

11. Restart the certificate service:
sudo /opt/bitnami/ctlscript.sh restart12. It is done. You can check the response with MX toolbox: https://mxtoolbox.com/SuperTool.aspx?action=txt%3a_acme-challenge.mindyourdata.org&run=toolpage
You should see new records there (in mxtoolbox).
Section created: 2020-01-27 12:17 pm
Requesting for the certificate
If you’d like to use Let’s Encrypt certificate for your AWS Lightsail instance you should follow the official tutorial.
However, there is one thing missing in these instructions. Namely, the official tutorial assumes that you know how to deploy a DNS TXT record in the server of your domain provider. In other words, there is one step missing in the tutorial, between step no. 4 and step no. 5. I’ll call this missing step “step no. 4.5” further on.
I’ll explain how to deploy DNS TXT records for AWS Route 53, which provides the domain for mindyourdata.org
Assuming that you have finished step no. 4 from the official tutorial, you should see something like that in your Lightsail’s management console (“Networking” tab):

Now, for the step no. 4.5. My domain provider is AWS Route 53. Hence, I have to go to “Hosted Zones” and choose my domain. Then TXT records have to be added (if you install the certificate, for the first time), or updated/modified (if you are renewing you certificate):

Only then you can proceed to step no. 5 of the tutorial and confirm with MX Toolbox that the TXT records have propagated.
Finally, you can verify deployment of the records with Lightsail’s console (terminal).
Configuring automatic certificate renewal
Alternatively, if you are using Lightsail WordPress instance, you can use Bitnami HTTPS configuration tool (bncert) to automatically renew your certificate. In order to do so, you can follow this tutorial at AWS: https://lightsail.aws.amazon.com/ls/docs/en_us/articles/amazon-lightsail-enabling-https-on-wordpress#https-process-wordpress
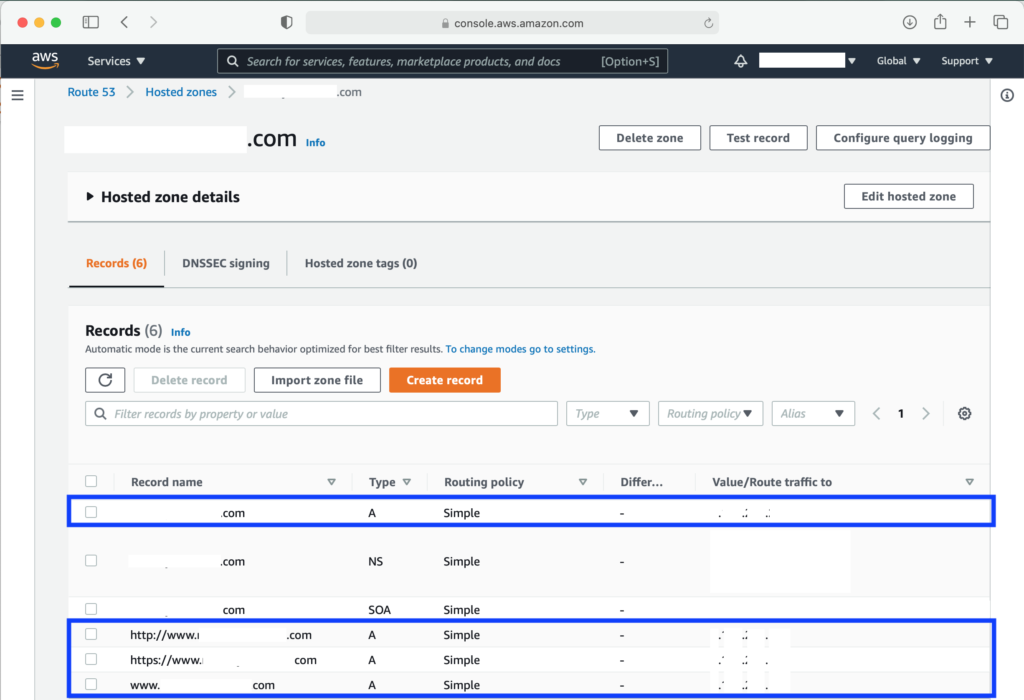
My note here is that, if you are using Amazon’s DNS service — Route 53 then you have to specify the redirects to the static IP address of your Lightsail WordPress instance (paragraph starting with “Add DNS records to the DNS of your domain …” at https://lightsail.aws.amazon.com/ls/docs/en_us/articles/amazon-lightsail-enabling-https-on-wordpress#https-process-wordpress). See a screenshot below:

bncert to work. The other two records (NS & SOA) were defined by default.Troubleshooting
In the case of the following error:
Account [email address of account] is not registered. Use 'run' to register a new account.try the solution described in the following post: https://stackoverflow.com/questions/66296890/lets-encrypt-bitnami-ssl-tool-error-account-is-not-registered-use-run-to (aka. https://stackoverflow.com/q/66296890/8877692).
Source of the cover photo image (CCL license): https://www.thebluediamondgallery.com/typewriter/images/certificate.jpg